Developing Training in Agile

Developing training in an agile working environment, is feasible and makes the most sense when the application development is also on an agile schedule. There are a variety of agile frameworks and levels projects can follow. It all depends on how agile the project is, how many iterations are planned, use the scaled agile or SAFe framework and how granular the Jira tasks are written. As the application is developed or updated, so too can the training. However, this can present a few challenges that take some getting used to and may cause headache and rework.

The problem lies with tasks that depend or are blocked by other tasks. Say for example, updates are done to the Search feature user interface (UI). The developer communicates that the updates are ready and the trainer begins making the updates. One important piece was left out. The updates had not gone through testing. The tester begins testing the new feature and a bug is discovered that affects the updates to the UI. The training would also need updated to incorporate new UI changes.

That begs the question, where does creating training fall in the agile framework. Some say after testing, but then the product is ready to deploy but the training is not ready. During the development process the UI is not ready for screen captures and many changes are still in progress. Training development may take longer than a short testing sprint. Therefore it must be started in the development stage with constant communication with UI developers and testers.
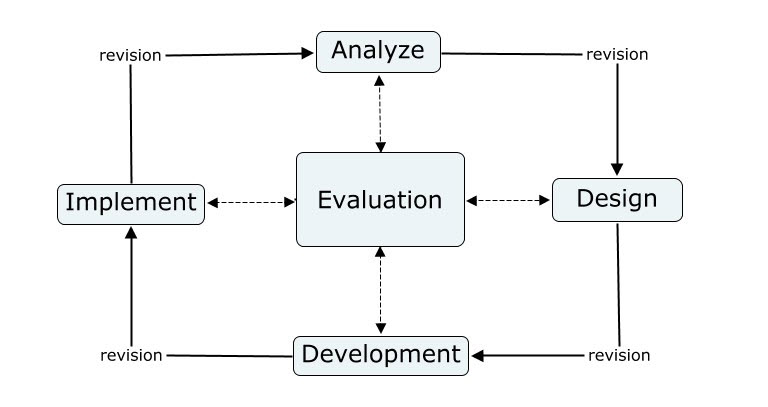
Retrieved from: https://medium.com/@chathmini96/agile-methodology-30ec4cdf3fc

Completing a Training Project with the ADDIE Model

The ADDIE model is the model many companies use to complete a training project. It is an iterative model for continuous improvement as well as a model for initial development.

ADDIEmodel
Retrieved from: https://commons.wikimedia.org/wiki/File%3AADDIE_Model_of_Design.jpg
How the ADDIE model can be used to develop training:
  • Analyze – Create a document analyzing the user and their needs. Include: Who is your audience (age, profession, role or title)? What are their needs? What types of tasks will they use the training for? Design the training from the end-users perspective so it’s the most applicable to their work flow. Create an outline of what will be included. Who are the stakeholders in this project. Will they need to sign off on this document?
  • Design – Create a document detailing out all aspects of the design. This document becomes a living document and can be updated throughout the project. Include  a schedule of when you will complete each deliverable in the process. Detail out the outline you created for the analysis and add screen shots of the software if possible. What software or tools will you use to create the training? How will it be implemented (published)? Will the stakeholders need to sign off on this document.
  • Develop – This is the development of the actual project. Create the project using the software and tools of your choice. Develop a script for the audio. Script writing can be very difficult. Keep in mind it should speak in an active voice, in present tense and to the user. Ex. To take a screen capture, press the PrtSc button on your keyboard, then click and drag the picture box to the size of your choice. Release the mouse and SnagIt will automatically open with your screen capture.
  • Implement – This process should be outlined in your design document. Will you need to publish it to a server? What are the file types that are needed? Will you need to send anyone the link to update a site page? Where will it be archived for the company?
  • Evaluate – How will the users evaluate the training so you know it’s effective or needs to be improved? For Ex: Was the player easy to use? Did they find the training helpful? Were there topics that should have been included but were not?

Templates, Templates, Templates!!!

As an Instructional Designer, templates are EVERYTHING! They help define processes, create consistency, and make designing education and training more efficient and effectively. Templates can be created and used for all aspects of our job from documentation to course or training design in software or an LMS.

Documentation Templates:

Documentation can be created for course and training design to assist with design planning. When I designed courses in higher education, we used templates for designing all aspects of the course. There were documentation templates for the overall design of the course (design document), for the syllabus and for each week of the course.

Here is a generic week 1 overview document:

In designing training, both the analysis and design pieces are both documentation. I use a template for each document.They are both word documents. The analysis document includes the purpose of the document, an overview of the project, the audience or users, implementation, instructional design strategies, an outline of the training, and places for the stakeholders to sign off. The design document includes much of the same information but also includes a project organization and schedule, and details of what will be included in the training.

A script template is also used to streamline the editing and voice-over process.

I’ve also created templates within the LMS to give courses the same look and feel, and also to make rapid course creation possible.

We also use a template for the software that we use to create the training (currently Articulate Storyline 2).

I love templates!!!

Instructional Design Strategies

Instructional design includes the following strategies:

  • Utilizing Technology – the screencasts will utilize the latest version of Articulate Storyline and will include highlights and zooms. The latest audio technology will also be used to create high quality voice-over.
  • Implement Elements and Principles of Design – design each scene with the elements and principles of design to create ease of learning:
    • Balance – balance the visual weight of objects, text, color, and space.
    • Emphasis – emphasis important text, create a visual hierarchy.
    • Movement – this is the path the viewers eye will take
    • Pattern- repetition of an object or placement of items.
    • Repetition – works with the pattern and creates unity. Repetition of objects and text in scenes creates ease of learning.
    • Proportion – the unity created when parts relate with each other.
    • Rhythm – one or more elements are used repeatedly, creating the feeling of organization.
    • Variety – the use of many elements to hold viewer’s attention.
    • Unity – harmony between all parts of work.
      Elements-Principles-Design
      From: https://www.getty.edu/education/teachers/building_lessons/principles_design.pdf

The final product was an Articulate Storyline 2 e-learning course, composed of 50 or more short tutorials that were task-based, included a Title, image, supporting/call out text, and audio with each slide displaying a uniform format. This created ease of learning to the audience.d